DIY: Hillbilly Washing Machine


This is a great method for off-the-grid low-tech clothes washing or, in my case, diaper washing as part of the Second Annual Flats and Handwashing Challenge.
The total cost to make this washer was around $6, and about 10 minutes. The amount of time it takes to operate depends entirely on the quantity of clothing and the type of material being washed. Denim, for example, will take more effort than t-shirts.
The first thing you need to do is obtain a suitable bucket
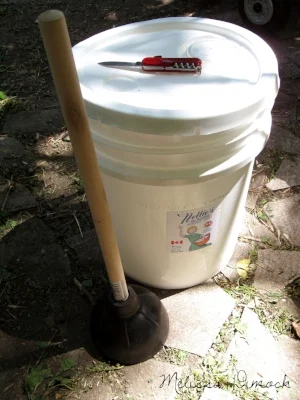
The first thing you need to do is obtain a suitable bucket. The place where I work often has empty 18.9L (5 US gallon) detergent buckets, so I popped over to pick one up. Total cost to me? $0
These buckets are great because the cover already has a small lidded opening in the cover -- you will want to use it with the cover on to avoid splashing. For optimum efficiency, it's best to have the hole centered in the lid, but I was coming at it from the "ease of construction" angle.
The other thing you need is a traditional-style toilet plunger.
The other thing you need is a traditional-style toilet plunger. I found one at a local building supply store for around $6.00.
The plunger acts as the agitator in your washing machine.

The plunger, and the plunging action employed through good old elbow grease, act as the agitator in your washing machine.
Depending on the style of your plunger, you may want to cut away the extra rubber flap inside -- this can contribute to overly sudsy wash water, which is something best avoided when washing cloth diapers as it requires much more rinsing.
Cut between 3 - 6 quarter-sized holes around the perimeter of the plunger.
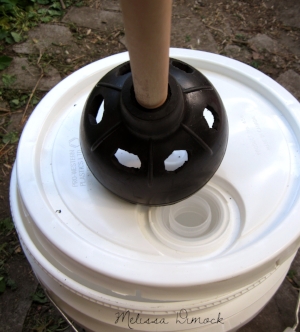
As an extra step to prevent this problem, you will want to cut between 3 - 6 quarter-sized holes around the perimeter of the plunger. It doesn't have to be perfect -- mine clearly isn't! I found that three holes wasn't enough, so I went for the full six.
Be very careful when cutting these holes -- I found the squishy, thick rubber quite difficult to deal with, even using a very sharp knife. Remember to practice safe knife practices when cutting these -- SAFETY CIRCLE, Everyone! :)
The next step is putting it through a trial run.

I opted to start with otherwise clean but freshly tie-dyed diapers, before moving onto washing today's dirties. I added my detergent (1/2 what I'd use in our regular washer) to the bottom of the bucket and then filled the bucket half-full with very hot water. I dumped in the diapers (about 8 flats, plus wipes and homemade fleece liners) and started plunging. In hindsight, I could have used a bit less detergent, as it required two rinses, but they got good and clean in very little time.
After the final rinse, I pulled them out of the bucket, wrung out as much water as possible, and hung them on the line. The rinse water went straight onto my flower beds, where my roses gratefully drank it up.

Overall, it went together quickly and was very easy to use. I stood the bucket on a knee-high step to facilitate the plunging, but I think I will get a longer handle for the plunger so I can set the bucket flat on the ground.
I'm not sure I'd want to wash two days' of diapers in one go, but doing a single day's worth was pretty easy and not a terrible way to unload the many little frustrations of my afternoon.
We will take it with us when we go camping this summer and leave it at our cabin for doing laundry. I think the threat of washing clothes this way will serve as an incredibly effective deterrent for bad behavior with my older kids!